| Soundtrack Planning Sheet |
Microphones: selection; handling; positioning for different environments (indoor, outdoor and studio)
Microphone Essay
History
A microphone, or ‘mic’, is a device for converting acoustic power into electric power that has essentially similar wave characteristics. Microphones convert sound waves into electrical voltages that are eventually converted back into sound waves through speakers. They were first used with early telephones and then radio transmitters.
In 1827, Sir Charles Wheatstone was the first person to coin the phrase "microphone."
In 1876, Emile Berliner invented the first microphone used as a telephone voice transmitter. At the U.S. Centennial Exposition, Emile Berliner had seen a Bell Company telephone demonstrated and was inspired to find ways to improve the newly invented device. The Bell Telephone Company was impressed with what the inventor came up with and bought Berliner's microphone patent for $50,000.
In 1878, the carbon microphone was invented by David Edward Hughes, and later developed during the 1920s. Hughes's microphone was the early model for the various carbon microphones now in use.
With the invention of the radio, new broadcasting microphones were created. The ribbon microphone was invented in 1942 for radio broadcasting.
In 1964, Bell Laboratories researchers James Westand Gerhard Sessler received patent no. 3,118,022 for the electro-acoustic transducer, an electret microphone. The electret microphone offered greater reliability, higher precision, lower cost, and a smaller size. It revolutionized the microphone industry, with almost one billion manufactured each year.
During the 1970's, dynamic and condenser microphones were developed, allowing for a lower sound level sensitivity and a clearer sound recording.
Types of microphone
· Condenser microphone
The condenser microphone, invented at Bell Labs in 1916 by E. C. Wente, is also called a capacitor microphone or electrostatic microphone – capacitors historically called condensers. Here, the diaphragm acts as one plate of a capacitor, and the vibrations produce changes in the distance between the plates.
· PZM
Several approaches have been developed for effectively using a microphone in less-than-ideal acoustic spaces, which often suffer from excessive reflections from one or more of the surfaces (boundaries) that make up the space. If the microphone is placed in, or very close to, one of these boundaries, the reflections from that surface are not sensed by the microphone. Initially this was done by placing an ordinary microphone adjacent to the surface, sometimes in a block of acoustically transparent foam. Sound engineers Ed Long and Ron Wickersham developed the concept of placing the diaphragm parallel to and facing the boundary. While the patent has expired, "Pressure Zone Microphone" or “PZM" are still active trademarks of Crown International, and the generic term "boundary microphone" is preferred.
· Dynamic microphone
Dynamic microphones work via electromagnetic induction. They are robust, relatively inexpensive and resistant to moisture. This, coupled with their potentially high gain before feedback, makes them ideal for on-stage use. Moving-coil microphones use the same dynamic principle as in a loudspeaker, only reversed. A small movable induction coil, positioned in the magnetic field of a permanent magnet, is attached to the diaphragm. When sound enters through the windscreen of the microphone, the sound wave moves the diaphragm. When the diaphragm vibrates, the coil moves in the magnetic field, producing a varying current in the coil through electromagnetic induction.
· Ribbon microphone
Ribbon microphones use a thin, usually corrugated metal ribbon suspended in a magnetic field. The ribbon is electrically connected to the microphone's output, and its vibration within the magnetic field generates the electrical signal. Ribbon microphones are similar to moving coil microphones in the sense that both produce sound by means of magnetic induction.
Microphone Sensitivity
Microphone Sensitivity, in plain terms, is the magnitude of the volume of sound that a microphone can record for a given signal; basically, it's the "loudness" of the sound that the microphone can pick up. A certain level of sound is played from a source and the microphone records this signal. The amplitude, or intensity, of the signal that the microphone can record is the sensitivity, or gain, of that microphone.
In engineering, the loudness, or sensitivity, is measured in volts, usually millivolts. The sensitivity tells us how much electrical output (in millivolts) a microphone produces for a certain sound pressure level at a certain frequency. If two microphones are subjected to the same exact sound pressure level at a certain frequency and one puts out a higher signal (higher voltage), that microphone has higher sensitivity than the other at that frequency.
Polar Patterns
The polar pattern of a microphone is the sensitivity to sound relative to the direction or angle from which the sound arrives, or easier worded how well the microphone “hears” sound from different directions.
· Figure of 8
Microphones with a figure of eight polar pattern pick up the sound from in front of the microphone and from the rear but not the side (90 degree angle). Microphones with this Figure of Eight polar pattern are typically ribbon or Large Diaphragm Microphones.
· Cardioid
A cardioid microphone has the most sensitivity at the front and is least sensitive at the back. It isolates from unwanted ambient sound and is much more resistant to feedback than omnidirectional microphones. That makes a cardioid microphone particularly suitable for loud stages.
· Super Cardioid
Super cardioid microphones offer a narrower pickup than cardioids and a greater rejection of ambient sound. But they also have some pickup directly at the rear. Hence it is important to place monitor speakers correctly. Super cardioids are most suitable when single sound sources need to be picked up in loud environments. They are the most resistant to feedback.
· Omnidirectional
The omnidirectional microphone has equal output or sensitivity at all angles, this means it picks up sound from all directions. Therefore the microphone has not to be aimed in a certain direction which is helpful especially with lavaliere microphones. A disadvantage is that an omni mic cannot be aimed away from undesired sources such as PA speakers which may cause feedback.
Which microphones to use
· Drums
For starters, you’ll normally want to stick with cardioid dynamic mics on the drums, a cardioid small diaphragm condenser on the hi-hat, and a matched pair of either large- or small-diaphragm condensers for the overheads. Note that condenser mics can certainly be used on the snare and toms (and for the more adventurous, even kick). It’s a case of; once you know the rules, feel free to break them. After all, you’re an artist, painting with sound…
Drum mic placement requires a lot of experimentation: ask the drummer to play, listen; move a mic a few inches, listen again. Better yet, stay in the control room and have your assistant (if you’re fortunate enough to have one) move the mics while you listen. With some experience, the process becomes streamlined: you’ll know which mics you like, and where you’re going to place them. But that’s just a starting point; even professional recording engineers will change mics and positioning on an inspired whim.
· Acoustic Guitar
A small diaphragm cardioid condenser is preferable here. As a starting point, aim it down, looking at the 12th fret, from about 6-8 inches away. Large diaphragm condensers can also work nicely on acoustic guitars, as well as ribbon mics. Have fun experimenting with different mics and placements to find what works best for you.
· Piano
Usually recorded in stereo. Use two large-diaphragm condenser mics, or a large diaphragm for the low strings, and a small diaphragm for the highs. Piano mic placement is highly variable, so a certain amount of experimentation is in order. There are also piano mic kits that take the guesswork out of mic choice and placement.
· Vocals
When it comes time to overdub vocals, you’ll want a large diaphragm condenser mic. For a lead vocal, you should match the mic to the vocalist – who may also have a personal mic preference. The best way to approach this is to set up three or four likely mics, and have the singer sing the same (critical) section of the song into each of them. Record each of these passes to individual tracks, then invite the singer into the control room for playback to decide which mic best matches his or her voice (and the song).
Environments: studio and location sound formats; mixing live sound; acoustic interference
There is a massive difference between recording indoors and outdoors using any microphone. Indoor recordings usually provide a quieter and calm recording, especially in a studio, allowing the microphone to pick up only the sounds that are loudest and closer to the microphone, which is why indoor recordings are best to use for such purposes as recording an audio track or specific sound effect. There is also no acoustic interference such as wind which may effect the final sound. Outdoor recordings are opposite to the silent and calm recording that indoor recording provides, as their a lot more strident and busy. However it is much more useful if you were looking for a range of different specific sounds as outdoor tends to have a larger variety of unique sounds (e.g. wind and background chatter) than indoors. When recording, live sound needs to be mixed together, therefore the EQ, distance from the microphone and volume levels need to be judged perfectly, especially when it is an ensemble of different instruments.
Monitor and control: monitoring and controlling of recording levels via peak program meters (PPMs) and volume units meters (VUMs); fundamentals of decibels (dBs)
A Peak Program Monitor (PPM), sometimes referred to as a Peak Reading Meter (PRM), is an audio metering device. Its general function is similar to a VU meter but there are some important differences. The rise time of a PPM (the time it takes to register the level of a sound) is much faster than a VU meter, typically 10 milliseconds compared to 300 milliseconds. This makes transient peaks easier to measure. The fall time of a PPM (the time it takes the meter to return to a lower reading) is much slower. PPM meters are very good for reading fast, transient sounds. This is especially useful in situations where pops and distortion are a problem.
Equipment: selection; configuration and operation (studio, inside, outside, on location); video; digital; from
single sources; from multiple sources
For the sound effects of the air in my Wallace and Gromit Soundtrack Production, I had to use a wind-shield for the microphone. This was not too hard to do as the sound of the wind is pretty much constant when the weather is correct outside. In addition to using wind-shields, I had recorded real sounds of trains that pass by at the station. For this I used my iPhone to record the sound as it is more portable to carry. The rest of the sound effects were made using objects that were located inside my house, for instance using an old toy train to make the "Toy Train" sound.
Connecting audio: awareness of talk-back; headphones; recognising and applying cabling connections
A talk-back is a microphone-and-receiver system installed in a recording/mixing console for communication between people in the control room and performers in the recording studio. Most semi-professional and professional consoles include such a system. The typical setup includes an internal microphone built directly into the console, and a series of switches. The switches allow the recording engineer to route the microphone signal to a variety of audio paths in the studio, such as the performer's headphones, a set of speakers in the recording area, or directly to a tape recorder. Using this tool, the engineer can communicate with a performer with headphones while they are performing in the studio without interfering with the recording.
A VU (volume unit) meter is an audio metering device. It is designed to visually measure the "loudness" of an audio signal. The VU meter was developed in the late 1930s to help standardise transmissions over telephone lines. It went on to become a standard metering tool throughout the audio industry. VU meters measure average sound levels and are designed to represent the way human ears perceive volume. The rise time of a VU meter (the time it takes to register the level of a sound) and the fall time (the time it takes to return to a lower reading) are both 300 milliseconds. The optimum audio level for a VU meter is generally around 0VU, often referred to as "0dB". Technically speaking, 0VU is equal to +4 dBm, or 1.228 volts RMS across a 600 ohm load. VU meters work well with continuous sounds but poorly with fast transient sounds.
The decibel (abbreviated dB) is the unit used to measure the intensity of a sound. The decibel scale is a little odd because the human ear is incredibly sensitive. In terms of power, the sound of the jet engine is about 1,000,000,000,000 times more powerful than the smallest audible sound, which is a huge difference.
On the decibel scale, the smallest audible sound (near total silence) is 0 dB. A sound 10 times more powerful is 10 dB. A sound 100 times more powerful than near total silence is 20 dB. A sound 1,000 times more powerful than near total silence is 30 dB. Here are some common sounds and their decibel ratings:
Distance affects the intensity of sound - if you are far away, the power is greatly diminished. All of the ratings above would be taken while standing near the sound. Any sound above 85 dB can cause hearing loss, and the loss is related both to the power of the sound as well as the length of exposure.
Synchronisation: timecode use; SMPTE
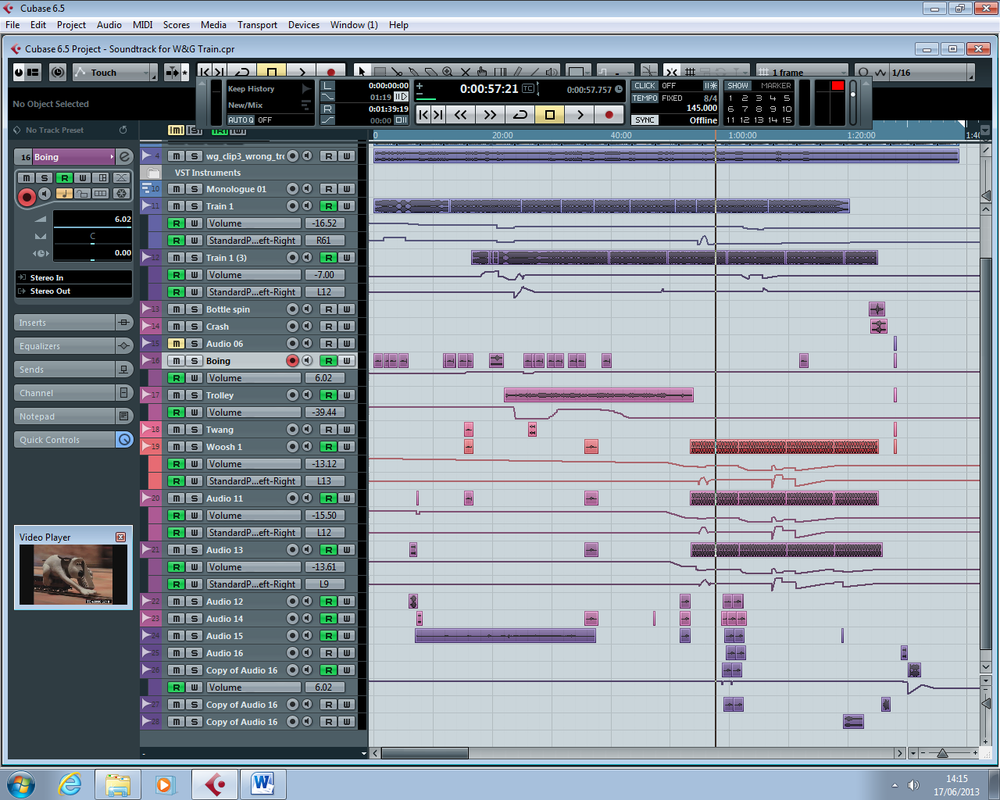
It is important to place the sound effects exactly as the action happens in order to create good continuity between the shots. You can see in the screenshot below the time code of 00:00:51:01 (represents hours, minutes, seconds and frame number) in the bottom-right of the screen. When compared with my storyboard in LO3 or at the bottom of this page, the soundtrack and SFX should all be positioned correctly and in perfect continuity.
Use of audio sound effects on the timeline in Cubase in synchronisation with the Wallace and Grommit video:
There is a massive difference between recording indoors and outdoors using any microphone. Indoor recordings usually provide a quieter and calm recording, especially in a studio, allowing the microphone to pick up only the sounds that are loudest and closer to the microphone, which is why indoor recordings are best to use for such purposes as recording an audio track or specific sound effect. There is also no acoustic interference such as wind which may effect the final sound. Outdoor recordings are opposite to the silent and calm recording that indoor recording provides, as their a lot more strident and busy. However it is much more useful if you were looking for a range of different specific sounds as outdoor tends to have a larger variety of unique sounds (e.g. wind and background chatter) than indoors. When recording, live sound needs to be mixed together, therefore the EQ, distance from the microphone and volume levels need to be judged perfectly, especially when it is an ensemble of different instruments.
Monitor and control: monitoring and controlling of recording levels via peak program meters (PPMs) and volume units meters (VUMs); fundamentals of decibels (dBs)
A Peak Program Monitor (PPM), sometimes referred to as a Peak Reading Meter (PRM), is an audio metering device. Its general function is similar to a VU meter but there are some important differences. The rise time of a PPM (the time it takes to register the level of a sound) is much faster than a VU meter, typically 10 milliseconds compared to 300 milliseconds. This makes transient peaks easier to measure. The fall time of a PPM (the time it takes the meter to return to a lower reading) is much slower. PPM meters are very good for reading fast, transient sounds. This is especially useful in situations where pops and distortion are a problem.
Equipment: selection; configuration and operation (studio, inside, outside, on location); video; digital; from
single sources; from multiple sources
For the sound effects of the air in my Wallace and Gromit Soundtrack Production, I had to use a wind-shield for the microphone. This was not too hard to do as the sound of the wind is pretty much constant when the weather is correct outside. In addition to using wind-shields, I had recorded real sounds of trains that pass by at the station. For this I used my iPhone to record the sound as it is more portable to carry. The rest of the sound effects were made using objects that were located inside my house, for instance using an old toy train to make the "Toy Train" sound.
Connecting audio: awareness of talk-back; headphones; recognising and applying cabling connections
A talk-back is a microphone-and-receiver system installed in a recording/mixing console for communication between people in the control room and performers in the recording studio. Most semi-professional and professional consoles include such a system. The typical setup includes an internal microphone built directly into the console, and a series of switches. The switches allow the recording engineer to route the microphone signal to a variety of audio paths in the studio, such as the performer's headphones, a set of speakers in the recording area, or directly to a tape recorder. Using this tool, the engineer can communicate with a performer with headphones while they are performing in the studio without interfering with the recording.
A VU (volume unit) meter is an audio metering device. It is designed to visually measure the "loudness" of an audio signal. The VU meter was developed in the late 1930s to help standardise transmissions over telephone lines. It went on to become a standard metering tool throughout the audio industry. VU meters measure average sound levels and are designed to represent the way human ears perceive volume. The rise time of a VU meter (the time it takes to register the level of a sound) and the fall time (the time it takes to return to a lower reading) are both 300 milliseconds. The optimum audio level for a VU meter is generally around 0VU, often referred to as "0dB". Technically speaking, 0VU is equal to +4 dBm, or 1.228 volts RMS across a 600 ohm load. VU meters work well with continuous sounds but poorly with fast transient sounds.
The decibel (abbreviated dB) is the unit used to measure the intensity of a sound. The decibel scale is a little odd because the human ear is incredibly sensitive. In terms of power, the sound of the jet engine is about 1,000,000,000,000 times more powerful than the smallest audible sound, which is a huge difference.
On the decibel scale, the smallest audible sound (near total silence) is 0 dB. A sound 10 times more powerful is 10 dB. A sound 100 times more powerful than near total silence is 20 dB. A sound 1,000 times more powerful than near total silence is 30 dB. Here are some common sounds and their decibel ratings:
- Near total silence - 0 dB
- A whisper - 15 dB
- Normal conversation - 60 dB
- A lawnmower - 90 dB
- A car horn - 110 dB
- A rock concert or a jet engine - 120 dB
- A gunshot or firecracker - 140 dB
Distance affects the intensity of sound - if you are far away, the power is greatly diminished. All of the ratings above would be taken while standing near the sound. Any sound above 85 dB can cause hearing loss, and the loss is related both to the power of the sound as well as the length of exposure.
Synchronisation: timecode use; SMPTE
It is important to place the sound effects exactly as the action happens in order to create good continuity between the shots. You can see in the screenshot below the time code of 00:00:51:01 (represents hours, minutes, seconds and frame number) in the bottom-right of the screen. When compared with my storyboard in LO3 or at the bottom of this page, the soundtrack and SFX should all be positioned correctly and in perfect continuity.
Use of audio sound effects on the timeline in Cubase in synchronisation with the Wallace and Grommit video:
Content: dialogue, eg individuals, groups, crowds; music, eg solo, ensemble, vocal, instrumental; location, eg background animate, background inanimate, wildtrack; SFX
The final edited video gets blocked for Copyright Infringement when uploaded to YouTube because of matched visual content and pre-recorded dialogue. I have placed the file on the Music Drive at college.
- Dialogue consists of the original voice acting
- Music is a solo instrumental piece on piano
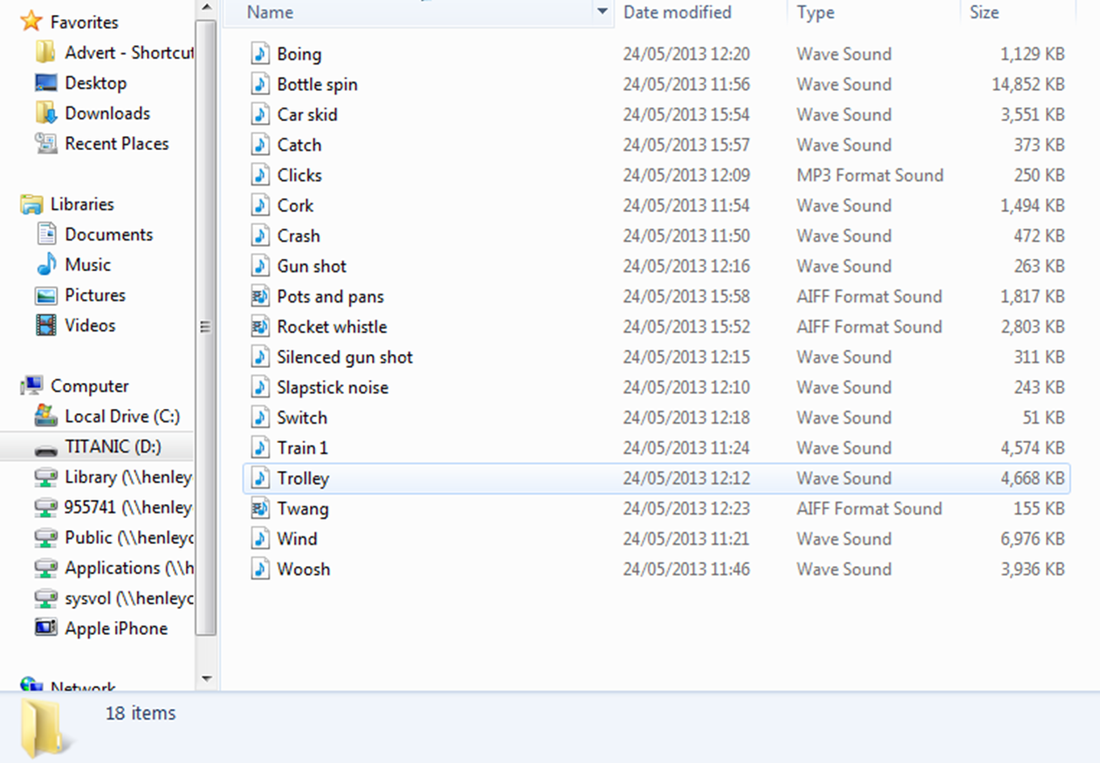
- Sound effects both background animate and inanimate from my library shown below were used
Documentation and storage: marking; storing and archiving of all types of sound recording media; logging tracks and timing; log soundtracks from video and audio rushes using time-code and control track.
When recorded, I put them all into a folder and called them suitable names so I could refer to them easily when creating the final soundtrack production.
The final edited video gets blocked for Copyright Infringement when uploaded to YouTube because of matched visual content and pre-recorded dialogue. I have placed the file on the Music Drive at college.
- Dialogue consists of the original voice acting
- Music is a solo instrumental piece on piano
- Sound effects both background animate and inanimate from my library shown below were used
Documentation and storage: marking; storing and archiving of all types of sound recording media; logging tracks and timing; log soundtracks from video and audio rushes using time-code and control track.
When recorded, I put them all into a folder and called them suitable names so I could refer to them easily when creating the final soundtrack production.
The Wallace and Gromit video clip we had to devise a soundtrack and SFX for, already has pre-recorded dialogue from its official voice actor. Therefore this is licensed by the creators of the film and would be a breach of copyright if I was to call it my own material. I used Cubase to create my own recorded music as using pre-recorded feel is not a professional conduct, as well as having to spend more time to get it royalty-free or paying for a license to use it. In addition, the sound effects were all recorded by me and for the same reasons stated previously. Once recorded, I put them all into a folder and named them suitably so I could refer to them easily when creating the soundtrack.